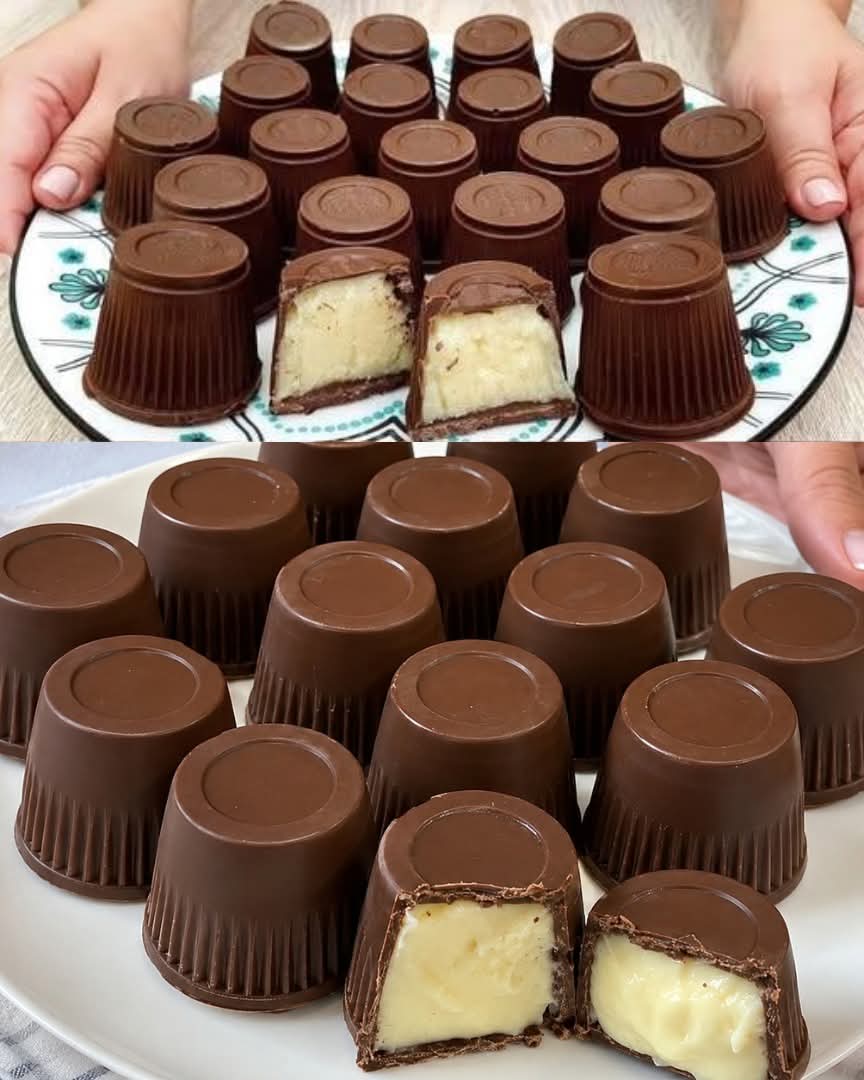
Chocolate Cupcake Liners (Cream-Filled Chocolate Cups)
Introduction
Chocolate Cupcake Liners, also known as Cream-Filled Chocolate Cups, are a delightful no-bake dessert that combines a crisp chocolate shell with a rich, silky vanilla cream filling. Made using silicone or paper cupcake liners as molds, these bite-sized treats are elegant enough for parties yet simple enough for beginners to make at home.
Every bite delivers a satisfying snap of smooth chocolate followed by a luscious, creamy center that melts in your mouth. They are perfect for birthdays, holidays, afternoon tea, edible gifts, or whenever you’re craving a luxurious homemade candy.
Nutritional Information
Approximate values per chocolate cup (based on 18 servings):
- Calories: 185 kcal
- Protein: 2 g
- Carbohydrates: 16 g
- Sugar: 14 g
- Fat: 13 g
- Saturated Fat: 8 g
- Fiber: 1 g
- Sodium: 35 mg
- Calcium: 40 mg
Nutritional values may vary depending on the chocolate and filling used.
Ingredients
For the Chocolate Shell
- 500 g milk chocolate, chopped
- 1 tablespoon coconut oil or cocoa butter (optional, for a smoother finish)
For the Cream Filling
- 250 ml whole milk
- 200 ml heavy cream
- 80 g granulated sugar
- 2 egg yolks
- 25 g cornstarch
- 1 teaspoon vanilla extract
- 30 g unsalted butter
Optional Add-Ins
- White chocolate pieces
- Hazelnut spread
- Peanut butter
- Crushed Oreos
- Toasted coconut
- Chopped almonds
- Mini chocolate chips
- Caramel sauce
Equipment
- Silicone cupcake liners or paper cupcake liners
- Cupcake pan (optional)
- Mixing bowls
- Saucepan
- Whisk
- Spoon
- Pastry brush
- Refrigerator
Instructions
Step 1: Prepare the Filling
In a saucepan whisk together:
- Sugar
- Cornstarch
- Egg yolks
Slowly whisk in the milk and cream.
Cook over medium heat while stirring continuously.
Once the mixture thickens into a smooth custard, remove from the heat.
Stir in:
- Butter
- Vanilla extract
Transfer to a bowl.
Cover with plastic wrap touching the surface.
Refrigerate for 2 hours.
Step 2: Melt the Chocolate
Place chopped chocolate into a heatproof bowl.
Melt using:
- Microwave (30-second intervals)
- Double boiler
Stir until silky smooth.
Mix in coconut oil if desired.
Step 3: Coat the Liners
Brush or spoon melted chocolate inside each cupcake liner.
Cover:
- Bottom
- Sides
Freeze for 10 minutes.
Repeat with another chocolate layer for a stronger shell.
Freeze again.
Step 4: Add the Filling
Transfer chilled custard into a piping bag.
Fill each chocolate shell, leaving about 5 mm of space at the top.
Do not overfill.
Step 5: Seal the Cups
Cover each filled cup with melted chocolate.
Smooth with a spoon.
Tap gently to remove air bubbles.
Refrigerate for 30–60 minutes.
Step 6: Unmold
Carefully peel away the liners.
Serve chilled or at cool room temperature.
Methods
Traditional Method
Cook the vanilla custard on the stovetop and mold the chocolate by hand.
Produces the richest homemade flavor.
Quick Method
Use:
- Instant vanilla pudding
- Melted chocolate
Ready in under an hour.
Luxury Method
Use premium couverture chocolate and enrich the filling with mascarpone or white chocolate for a gourmet finish.
Frozen Version
Freeze the cups for a refreshing summer dessert with an ice cream–like center.
History
Chocolate candies with creamy fillings have been enjoyed since the late 19th century, when chocolatiers in Europe began creating filled bonbons. As home baking became more popular, cooks adapted these confections using cupcake liners or silicone molds, making it easy to create beautiful chocolate cups without specialized equipment. Today, homemade cream-filled chocolate cups are a favorite for celebrations, holiday gift boxes, and dessert tables around the world.
Formation
The magic of these chocolate cups comes from the contrast of textures:
- A glossy chocolate shell provides a satisfying snap.
- A smooth vanilla custard filling creates a rich, creamy center.
- Chilling allows the chocolate to harden while the filling stays soft and silky.
- Cupcake liners help achieve an even shape and make unmolding easy.
Serving Suggestions
Enjoy these chocolate cups with:
- Coffee
- Espresso
- Hot chocolate
- Fresh strawberries
- Raspberries
- Vanilla ice cream
- Whipped cream
They also make wonderful edible gifts when wrapped individually.
Storage
- Refrigerate in an airtight container for up to 5 days.
- Freeze for up to 2 months.
- Thaw in the refrigerator before serving.
- Keep away from heat to prevent the chocolate from melting.
Why People Love This Recipe
Dessert lovers adore these chocolate cups because they:
- Have a rich chocolate shell with a creamy center.
- Require no baking.
- Look elegant and professional.
- Are perfect for parties and holidays.
- Can be customized with different fillings and flavors.
- Are fun to make with family and friends.
- Taste like gourmet chocolates from a candy shop.
Helpful Tips
- Use high-quality chocolate for the best flavor and shine.
- Chill the chocolate shell between coats to prevent cracking.
- Ensure the custard is completely cold before filling the cups.
- Leave a small gap at the top so the chocolate lid seals neatly.
- Store chilled until ready to serve for the best texture.
Conclusion
Chocolate Cupcake Liners (Cream-Filled Chocolate Cups) are an irresistible homemade confection that combines crisp chocolate with a velvety vanilla filling. Elegant, easy to customize, and surprisingly simple to prepare, they’re a perfect dessert for special occasions or everyday indulgence. Whether shared with loved ones or enjoyed as a personal treat, these creamy chocolate cups are guaranteed to impress with every delicious bite.